In the dynamic landscape of home labs, enthusiasts are constantly seeking innovative solutions to enhance productivity and collaboration. One such powerful tool is Nextcloud—a self-hosted, open-source platform that transforms your home lab into a secure and private cloud storage and collaboration hub. In this guide, we’ll explore the ins and outs of setting up and maximizing Nextcloud in your home lab.
What is Nextcloud?
Nextcloud is a versatile platform that combines file synchronization, secure communication, and collaboration features in one self-hosted package. Though, for the most part my focus today is on file sync and storage.
Step 0: Preparing for a Nextcloud Installation
We have a couple things we need to figure out before we get started:
- We need to define our storage location and requirements, in my case I setup a 2 drives in RAID 1 and mounted this at /datadrive on the host that will be running my Nextcloud server.
- We need to make sure we’re running an up to date Linux Distribution, I recommend Debian or Ubuntu.
- We need to set up port forwarding for ports 80 and 443, and point them to the IP address of the host you’ll be running Nextcloud on. If you’re not going to be exposing this to the outside world, you can look up how to configure NGINX Proxy manager with your own SSL Certificate, that’s outside the scope of this post.
- We need to setup a dns record – ex if your server is located at cloud.example.com, setup an A record with the name cloud.example.com pointing to the external IP of your firewall or server, depending on how you’re setting this up.
Step 1: Installing Nextcloud
When it comes to installing Nextcloud, choosing between Docker and a traditional installation method depends on your preferences, the level of control you want, and your familiarity with each approach. I chose to go with a docker installation, here’s why:
- Isolation:
- Docker containers encapsulate Nextcloud and its dependencies, providing a consistent and isolated environment. This allows me to run as many apps as I want without conflicting with others.
- Easy Deployment:
- Docker simplifies the deployment process, allowing you to pull a pre-configured Nextcloud image and run it without worrying about complex configurations.
- Version Management and Updates:
- Docker makes it easier to manage and switch between different Nextcloud versions by pulling the desired Docker image.
Here’s a diagram of how my Nextcloud Docker Containers are setup:
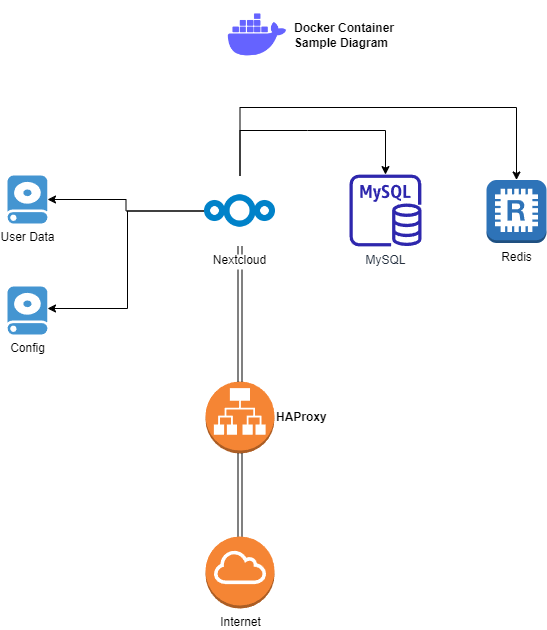
I decided to go with Docker-Compose for my installation, it allows me to run a simple command to update the Docker container, I’ll have a separate section on running updates later. Here’s what my prep looked like for my Nextcloud setup:
Setup Virtual Networks
Setup Disk
Create Docker Compose file
sudo mkdir /apps
sudo mkdir /apps/nextcloud
cd /apps/nextcloud
sudo nano docker-compose.yml
version: '3'
services:
nextcloud_db:
container_name: nextcloud_db
image: mariadb
restart: always
command: --transaction-isolation=READ-COMMITTED --binlog-format=ROW
networks:
- cloudnet
volumes:
- ./nextcloud-db:/var/lib/mysql
environment:
- MYSQL_RANDOM_ROOT_PASSWORD=true
- MYSQL_PASSWORD=RANDOMPASSWORD
- MYSQL_DATABASE=nextcloud_db
- MYSQL_USER=nextcloud_db_user
nextcloud:
container_name: nextcloud-app
image: nextcloud:26-apache
restart: always
networks:
- cloudnet
- nginxproxymanager_default
ports:
- 4080:80
volumes:
- ./nextcloud-docroot:/var/www/html
- /datadrive/nextcloud:/var/www/html/data
environment:
- NEXTCLOUD_DATA_DIR=/var/www/html/data
- MYSQL_PASSWORD=RANDOMPASSWORD
- MYSQL_DATABASE=nextcloud_db
- MYSQL_USER=nextcloud_db_user
- MYSQL_HOST=nextcloud_db
- REDIS_HOST=nextcloud_redis
redis:
image: redis:alpine
container_name: nextcloud_redis
volumes:
- /docker/nextcloud/redis:/data
networks:
- cloudnet
restart: unless-stopped
networks:
cloudnet:
driver: bridge
nginxproxymanager_default:
external: true
Next up launch the container you just created:
docker-compose up -dStep 2: Securing your Nextcloud instance:
Enable HTTPS:
Secure your Nextcloud instance by configuring HTTPS. Utilize free certificates from Let’s Encrypt for an added layer of security. I use NGINX Proxy Manager for my front end, here’s how that’s setup:
sudo mkdir /apps/nginxproxymanager
cd /apps/nginxproxymanager
sudo nano docker-compose.yml
# docker-compose.yml
version: "3"
services:
app:
image: 'jc21/nginx-proxy-manager:latest'
restart: unless-stopped
ports:
# These ports are in format <host-port>:<container-port>
- '80:80' # Public HTTP Port
- '443:443' # Public HTTPS Port
- '81:81' # Admin Web Port
# Add any other Stream port you want to expose
# - '21:21' # FTP
volumes:
- ./data:/data
- ./letsencrypt:/etc/letsencrypt
Next up we log in to NGINX Proxy Manager and setup our new npm install. When prompted for a login use the following default:
Default Proxy Manager username: [email protected]
Default Proxy Manager password: changeme
You will be prompted to set a new username and password. Make it nice and secure as this could be used to maliciously redirect your website if someone gained access to it.
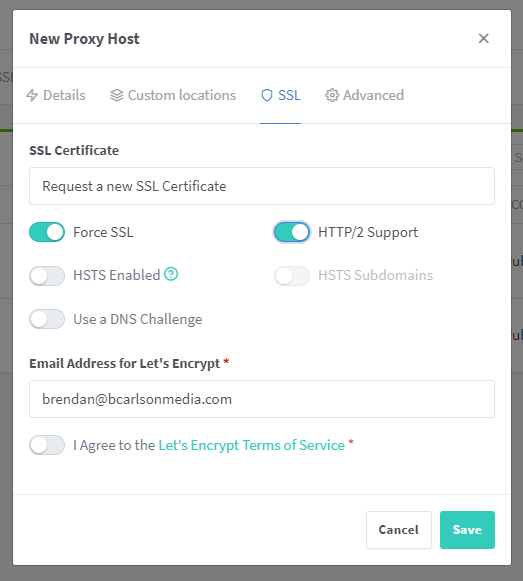
Now that you’re logged in, we’re gonna setup a new proxy host:

On the SSL Tab Select “Request a new SSL Certificate” from the dropdown to use a free Let’s Encrypt certificate. Also enable HTTP/2 support and Force SSL.
Under the advanced tab enter the following:
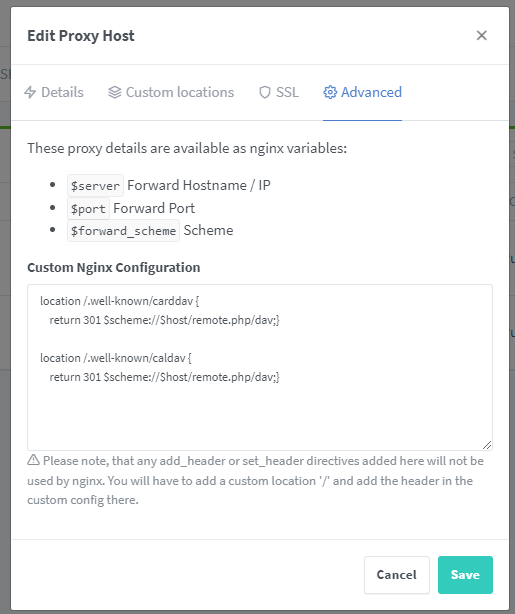
location /.well-known/carddav {
return 301 $scheme://$host/remote.php/dav;}

location /.well-known/caldav {
return 301 $scheme://$host/remote.php/dav;}
Then hit “Save”
Assuming everything is setup correctly – you should now be able to access your Nextcloud instance at the domain of your choice.
Once your logged in to your account, it’s time to enable 2 Factor Authentication. The easiest way to do this is using the TOTP plugin.
- Navigate to the Security Settings:
In the Admin Interface, go to the top-right corner and click on your profile picture. From the dropdown menu, select “Administration Settings.” - Access the Security Section:
Within the Settings page, find and click on the “Security” section. This is where you can manage security-related settings. - Enable Two-Factor Authentication:
Look for the “Two-Factor Authentication” option. Toggle the option to “Enforce two-factor authentication. - Configure 2FA for Users:
Once you’ve enabled 2FA, users can configure it for their accounts. Users will be prompted at the next login to set up two-factor authentication for their account. If already logged in, users can go to their personal settings (by clicking on their profile picture) and navigate to the “Security” section. There, they can follow the instructions to set up 2FA based on the method you’ve enabled.
Step 3: Setup a Cron Job
We now need to add a cron job for Docker
sudo crontab -eAdd the following line
*/5 * * * * docker exec -u www-data nextcloud_app php /var/www/html/cron.phpStep 4: Migrating your files
Migrating files to Nextcloud can be a straightforward process, and the best method depends on the amount of data, your existing storage solution, and your preferences. Here are some commonly used methods for migrating files to Nextcloud:
- Manual Upload:
- For a small amount of data or if you want to selectively migrate files, manually uploading through the Nextcloud web interface is a simple option.
- Log in to your Nextcloud instance, navigate to the desired folder, and use the web interface to upload files.
- Nextcloud Desktop Client:
- The Nextcloud Desktop Client provides a convenient way to synchronize files and folders between your computer and the Nextcloud server.
- Install the Nextcloud Desktop Client on your computer, configure it with your Nextcloud server details, and select folders to synchronize. The client will handle the upload in the background.
- Nextcloud Mobile Apps:
- If you have files on your mobile device, you can use the Nextcloud mobile apps (available for iOS and Android) to upload files to your Nextcloud instance.
- WebDAV:
- Nextcloud supports the WebDAV protocol, allowing you to mount your Nextcloud storage as a network drive on your computer.
- You can use a WebDAV client to drag and drop files into the mounted Nextcloud drive.
Conclusion
By incorporating Nextcloud into your home lab, you’ve transformed it into a secure, private, and feature-rich cloud collaboration platform. From file synchronization to secure communication, Nextcloud empowers you to take control of your data. Follow this comprehensive guide, and unlock the full potential of Nextcloud in your home lab journey. Happy syncing!